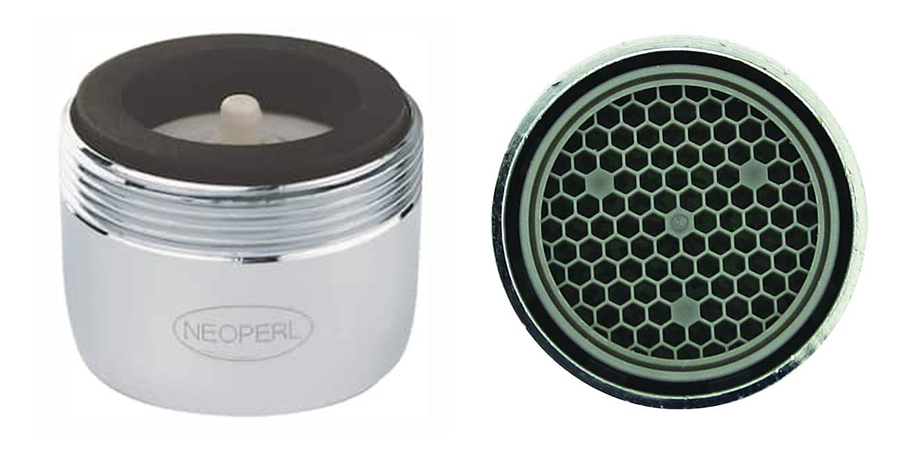
A faucet aerator is a plumbing component installed or fitted at the top of a kitchen and bathroom faucet. It has a metal or plastic housing with fine mesh screens and a restrictor inside that creates a steady flow by adding air to the water. Although you don’t necessarily need one, aerators reduce splashing and minimize water use without sacrificing pressure.
Faucet Aerator Video Explanation
This little gadget right here is called an Aerator. These faucet aerators induce water and air together to make a nice smooth stream come out of it. This screen right here will get collected with hard water deposits, therefore allowing an abnormal stream to come out of it that will cause it to splash onto the counter, cause erosion of your counter, damage hard water deposits, and also splash onto, like I got right here, a uniform or a nice suit and tie. Once you repair this aerator and you get a nice smooth flow out of it, it’s not going to splash onto the countertop or onto your clothes.
Brief History of Faucet Aerators
Elie Prodromou Aghnides, a Greek engineer from Istanbul, invented the faucet aerator in 1943. He was fascinated by the water bubbling from a waterfall and found that this happens when the air is drawn into the stream and breaks it into tiny droplets.
Nowadays, aerators are already assembled in most kitchen and bathroom faucets and can be replaced in case of any damage. If yours does not have one, you can buy a separate aerator and install it by screwing it onto the faucet’s end.
Types of Sink Aerators
Exterior Aerators
These aerators screw onto the outside of the faucet’s spout. They are visible to the naked eye and come in various sizes and flow rates, which help you choose the one that suits your preferences.
Interior Aerators
Interior aerators are installed inside the faucet’s spout. They offer a seamless look and are less prone to tampering or accidental removal than exterior aerators.
Step-by-Step Guide to Cleaning an Aerator
Over time, a sink aerator gets contaminated with debris and sediments and loses its ability to maintain water freshness. Therefore, clean it twice a year with these steps:
- Preparation: Locate the shut-off valves under the sink and turn it clockwise to stop the water flow. Turn off the faucet and place a towel in the sink to prevent parts from falling down the drain during disassembly.
- Open: Cover the faucet with a rag, grip the aerator firmly, and use pliers or a wrench to turn it counterclockwise to unscrew from the faucet’s tip. If you have an interior aerator, use the small aerator key that comes with it to unscrew it.
- Disassemble: Separate all the parts, i.e., mesh screen, flow restrictor, and washer, carefully.
- Clean: Thoroughly rinse all the parts and soak them in white vinegar for 30-45 minutes. Next, remove them from the vinegar and rub a soft brush to get rid of any remaining debris from the mesh screen and flow restrictor.
- Reassemble: Carefully reassemble the aerator by putting all components back in place.
- Screw the aerator back onto the faucet: Hold the aerator in place on the faucet’s tip, wrap it with the rag, and turn it clockwise until snug. Use the aerator key to screw the aerator inside the faucet.
- Turn on: Slowly turn on the water to test the flow.
- Check for leaks: Look closely and make sure there are no leaks around the aerator or the faucet.
This regular maintenance prolongs the life of your aerator and ensures a smooth-running plumbing system.
When to Replace the Aerator?
Sometimes, cleaning the aerator doesn’t help. The only remedy here is to reinstall it. Here are some telltale signs:
- Water is not coming out as bubbly and soft as before.
- Low water pressure.
- Water is not spraying straight down the faucet.
- Odd tastes or odors post-cleaning indicate a failing filter.
- Visible cracks or breaks over the aerator parts that indicate physical damage.
Replacing the sink aerator is quite easy. Here’s how:
- Use a wrench, pliers, or the aerator key to unscrew it from the faucet’s tip.
- Wipe the faucet head clean to remove any debris or buildup.
- Measure the diameter of the faucet spout or check the aerator size in the owner’s manual to ensure you get the right replacement.
- Put a rag around the new aerator and screw it onto the faucet by turning it clockwise until it’s snug. Be careful not to over tighten, as this could damage the faucet threads.
- Now, move the shut-off valves counterclockwise under the sink to restore the water flow.
- Turn on the faucet and check for any leaks around the aerator. If water is dripping out, tighten the aerator slightly until the leak stops.
- Run the faucet to ensure the water flows smoothly and evenly through the new aerator.
Conclusion
The aerators conserve water and lower energy bills while maintaining the faucet’s consistent pressure. They also minimize splashing and improve water quality. By recognizing signs such as persistent clogging, visible damage, inefficient performance, or changes in water quality, you can determine when it’s time to clean or replace the aerator.